
One of the routine jobs that you will have to do on your dirt bike is bleeding the front and rear brakes. Knowing how to bleed dirt bike brakes is important because it is something that should be done regularly.
It is a fairly simple job and even if you’re not that mechanically inclined, you should be able to do it yourself by following these steps.
Your brake lines absorb air and moisture over time, which deteriorates the brake fluid and leads to your brakes feeling spongy and losing their stopping power.
There are a few simple steps involved in bleeding your front brake. You should first consult your bike’s service manual for information specific to your bike.
You’ll find specs on the correct brake fluid to be used, but it will also be marked on the master cylinder cap.
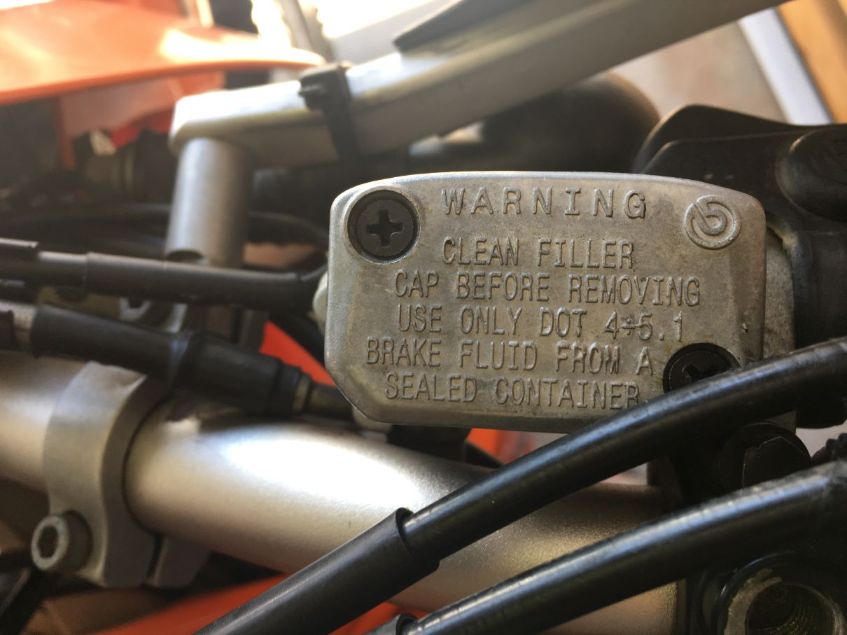
Don’t use anything other than what is recommended, it can damage the seals and lead to a rebuild that may require a professional service.
Before you start, be sure to take the necessary precautions to protect your skin and your bike.
Brake fluid is a pretty harsh chemical, so wearing rubber gloves and even safety glasses are a good idea.
It can also strip paint and damage your plastics, so be sure to protect your bike with a soft rag wrapped around the master cylinder to protect against spillage.
How to Bleed Dirt Bike Brakes
Step 1:
Your bike should be clean, especially around the brake reservoir, because the last thing you want is any dirt or muck getting into the reservoir as you remove the filler cap.
With your bike on a center stand, position your handlebars so that the master cylinder is level, and carefully remove the two Philips screws.
Remove the cap and the rubber diaphragm, it will usually come off with the cap. Take care not to drop it or get it dirty.

Step 2:
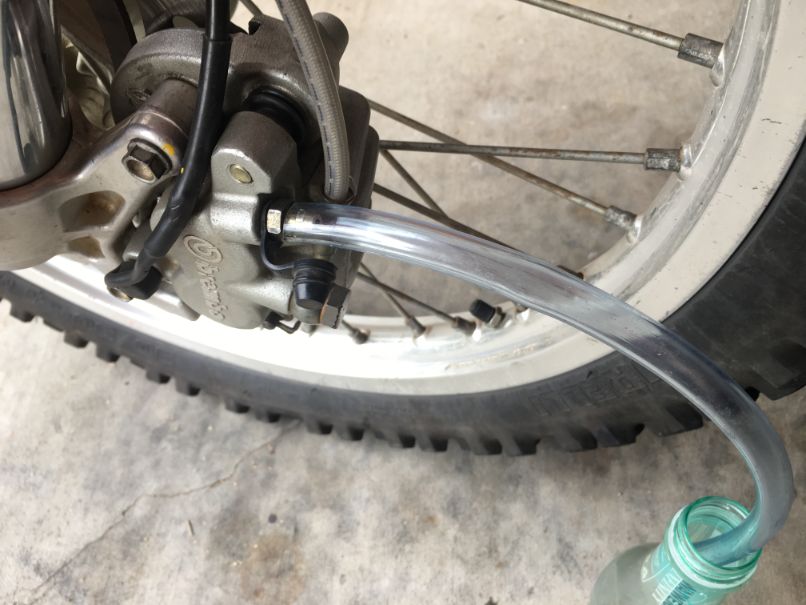
Go to the brake caliper at the front wheel. Remove the protective rubber cap from the bleeder nipple. Use a clear piece of plastic tubing that is sized to fit snugly over the bleeder valve nipple.
It will need to be long enough to drain into a catch bottle which will sit on the floor.
To prevent air from getting into the system, put a small amount of the brake fluid into the catch bottle, and ensure that the end of the tube is submerged in the fluid.
Select an open-ended spanner that fits the hex nut on the bleeder nipple.
Step 3:
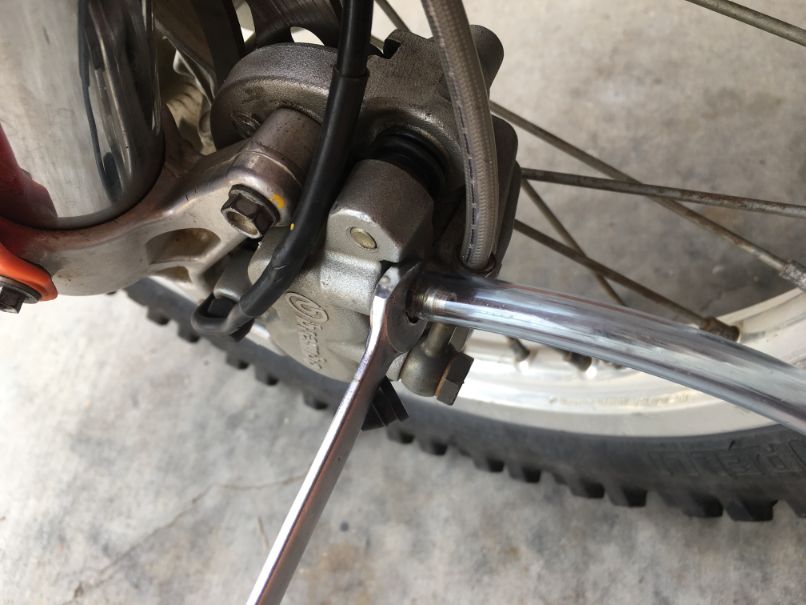
This is where the help of a second person makes the process easier. Have them squeeze the front brake lever several times and hold it in.
Loosen the bleeder valve about a quarter turn while keeping pressure on the lever. A small amount of air and old brake fluid should exit the bleeder valve and be seen in the clear tube, and the lever will go to the grip.
Tighten the nipple THEN let the pressure off of the lever. Repeat the process as necessary to work the air and fluid out of the system until you see new fluid coming out.
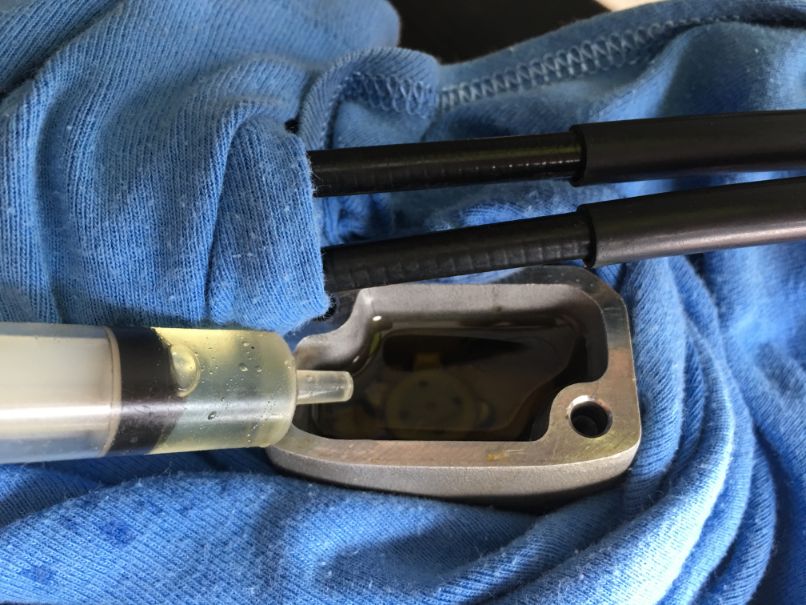
Keep an eye on the fluid level in the reservoir and keep topping up throughout the bleeding process. A small plastic syringe is a good way to add a small amount of fluid without spilling it.
If all the fluid is consumed at the master cylinder and air is sucked in, you will have to start the whole process again.
Be careful that no small contaminants get into the reservoir when filling as they can lead to premature wear. This procedure will have to be repeated a few times, or a lot of times depending on how much air is in the system.
Keep bleeding until there is clean brake fluid with no air bubbles coming out of the bleeder valve.
Step 4:
Once the bleeding is complete and the brake action has been restored, ensure the fluid level in the master cylinder is at the upper level of the fill line and carefully install the diaphragm and cap.
Double-check the bleeder valve is tight and refit the protective rubber cap on the nipple.
Test the brakes by rolling the bike forward and backward and compressing the forks, and going for a test ride if possible.
The rear brakes can be bled by following the same process.
Now you know how to bleed your dirt bike brakes.
If the problem persists and the brakes become spongy again after one or two rides, or you are unable to restore the brake feel after following the steps above, there may be worn out components or seals.
It’s best to talk to your local bike shop as a professional service may be required.
Make The Job Easier
A handy little tool that makes the job a one-person task is a Motion Pro Mini Brake Bleeder. It is simply a one-way valve that prevents air from getting into the system.
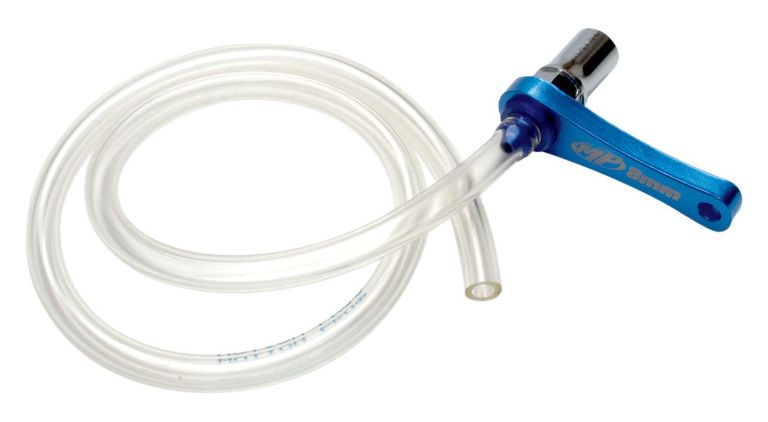
It fits over the bleeder nipple and includes a small lever that eliminates the need for a wrench. It is available in 8,10 & 11mm sizes to suit your bleeder valve size.
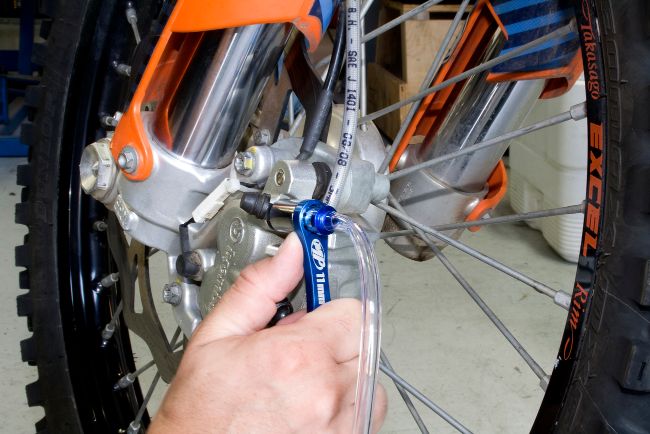
The end of the plastic tube is inserted into a catch bottle. No more worries about allowing air back into the system, causing you to have to start the process again,
At about $26 it’s money well spent.
Related Posts

How To Lower A Dirt Bike Seat Height
How To Replace Your Dirt Bike Battery

How To Winterize Your Dirt Bike
Do you have any helpful tips for bleeding your Dirt Bike Brakes? Please feel free to share your thoughts below.