With most dirt bikes being electric start nowadays, keeping your battery fully charged is essential. Here is a useful guide with 7 simple steps to take to replace your dirt bike battery, and some tips for keeping your battery in good working order.
Some dirt bikes don’t even have a kick start anymore, making reliance on the battery critical.
Batteries are designed to last about three years if you take good care of them, and luckily removing and replacing your battery is a fairly simple process, there are just a few important things to remember.
Replacing Your Dirt Bike Battery
Step 1: Check Your Manual
It’s always good to first read your manual for your specific bike. There are a few things you should be aware of, and your manual is the first step.
I ride a KTM, have been riding for decades, and constantly refer to the manual. Bikes are more complex nowadays, so it’s always good to check, no matter what job you are doing on the bike.
Step 2: Access Your Battery
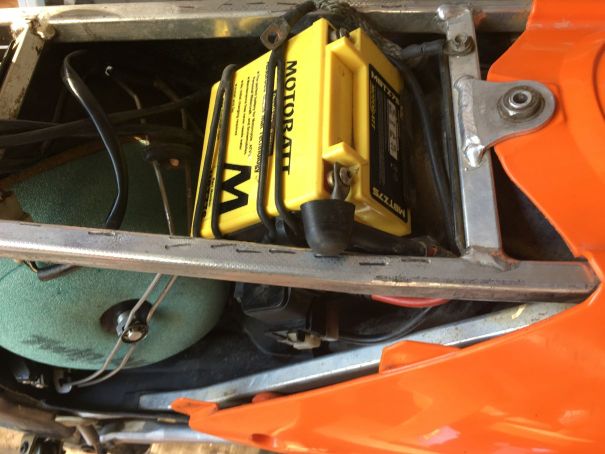
Put your bike on a stand so that it is sitting level. With most dirt bikes it is necessary to remove the seat and/or side cover to get access to the battery.
It’s a good precaution to make sure there are no flammable liquids nearby, just in case you accidentally cause a spark when disconnecting the cables.
Protective eyewear and gloves are advisable in case you come into contact with battery acid. Most motorcycle batteries these days are the sealed AGM or gel type, so there are no spillage issues when the bike is not upright.
Step 3: Disconnecting The Cables
The most important thing here is to remove the cables in the correct order.
Before you do this, it is a good precaution to put a rag into any areas that the screw is likely to fall into should you drop it when removing it.
Nothing is more frustrating than trying to find the little screw somewhere in the depths of the bike’s airbox area, especially if it’s nighttime, or you’re in a hurry to get out and ride. I’m speaking from personal experience here.
Disconnect the negative cable (usually Black or braided) first.
Once it is disconnected, tuck it to the side so that it doesn’t accidentally contact the terminal again and cause a spark while you are disconnecting the positive cable.
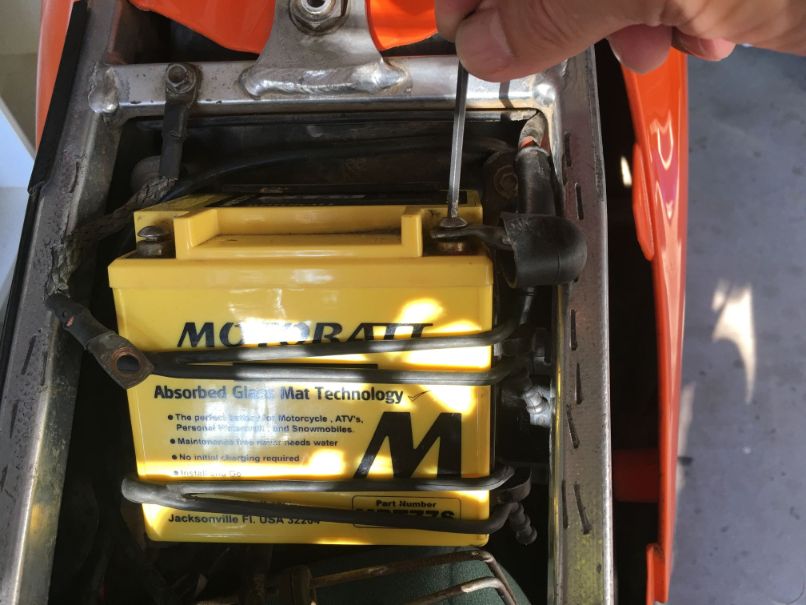
Disconnect the positive cable (usually Red) second.
With the negative cable disconnected, you can now safely disconnect the positive cable.
It’s best to reinsert the screws back into the terminals so that they don’t get lost.
Step 4: Remove the Battery From The Bike
You can now remove any straps or hold-downs that secure the battery and remove the battery from the bike.
You need to be careful that any lead nuts that are housed in the terminals don’t drop out.
Step 5: Inspect the Battery
Take a moment to look over the battery to determine if it’s time to replace the battery.
Obvious things to look for are broken or damaged terminals, leaking battery acid, cracking or rupturing of the plastic case.
Motorcycle batteries can be counted on to last about 3 to 5 years when taken care of, so if it is approaching this age and starting to struggle when starting the bike, even when it’s been on a charger, it is most likely time for a new one.
Step 5: Fitting The New Battery
Make sure the new battery is the same size as the old one, and the correct power for your dirt bike.
Some batteries come without the acid, so if yours is that type, it’s best to have your local bike shop fill it for you.
Be sure to fit it in the housing the same way as the old battery, with the terminals on the correct side.
Replace the rubber straps or whatever hold-downs your bike has to secure the battery in place.
Step 6: Reconnecting The Cables
If the cable ends have begun corroding you may need to wire brush them to clean them up or replace them if needed.
The order that you connect the cables is very important. The installation process is the opposite of removal, so you need to connect the positive (Red) cable first.
Once the positive cable is connected, then connect the negative cable.
Connecting them in the wrong order will cause sparking when the cables contact the terminal and may damage electrical components on your bike.
Step 7: Test It.
Before you replace the seat and side cover, turn on the ignition key (if it has one) just to check you’ve got power.
If it is all good, replace the seat and side cover and start the bike with the electric start to ensure it has been charged sufficiently.
You’re ready to ride.
Useful Battery Tips
Different Battery Types
Conventional Batteries: These are the original ‘old school’ type of lead-acid battery that has been around for about 100 years. The case holds a series of lead plates submerged in an acid solution called electrolyte.
They are the cheapest of all the battery types, but require maintenance and can be unsafe due to the corrosion acid being spilled.
This was always a problem especially in dirt bikes when the bike is frequently tipped over and leaks battery acid. Battery technology has since improved and they don’t perform as well as some of the newer types.
Gel Batteries: These use a gel form of electrolyte rather than the liquid used in conventional batteries. They aren’t best suited as starting batteries however and are more often used where ‘deep cycling’ batteries are needed such as marine and solar power storage applications.
Often confused with AGM batteries, people sometimes incorrectly refer to AGM batteries as Gel batteries.
AGM Batteries: Absorbed Glass Matt batteries (shown in images above) use the same technology as lead-acid batteries but use fiberglass mats that hold the electrolyte in place and prevent it from sloshing around like in the convention flooded cell batteries.
They are now the most commonly used type of battery, especially suited to motorcycles and dirt bikes because they are sealed, safer to use, and work well in different weather conditions.
Lithium Batteries: Or Lithium-Iron-Phosphate batteries use completely different technology to lead-acid batteries. They use completely dry lithium-based cells to create power. They are extremely light, high-performing, and are more expensive than the other types of batteries.
How can I tell if my battery is nearing the end of its life?
The obvious sign is when the battery is sluggish when trying to start the bike. If you have a voltmeter and are able to test it, a healthy 12-volt battery should read about 12.5 to 13.5 volts.
If the battery drops below 12.4 volts it will have trouble starting your bike, and if it reads under 11.8 volts the battery is considered to be dead.
How long does a battery last?
Generally, you will get about 3 years maybe more out of a battery if you look after it.
The worst thing you can do is let it run down completely. This will permanently damage a lead-acid battery, and once it has happened 2 or 3 times the battery will be dead.
Here are the main reasons a battery will run down:
- Letting your bike sit unridden for long periods of time will do it. Put your battery on a trickle charger if you’re not riding.
- Only ever riding short distances will not give your bike’s charging system enough time to recharge the battery. Running your bike on idle for a few minutes will not be sufficient to charge the battery.
- Incorrectly installed or excessive electrical accessories may run down the battery. (Not usually a problem with dirt bikes)
How many times can I recharge my battery?
If your battery has completely run down you can only recharge it a few times. Its capacity to hold a charge is reduced every time, so once the damage is done it can’t be undone and the battery is dead.
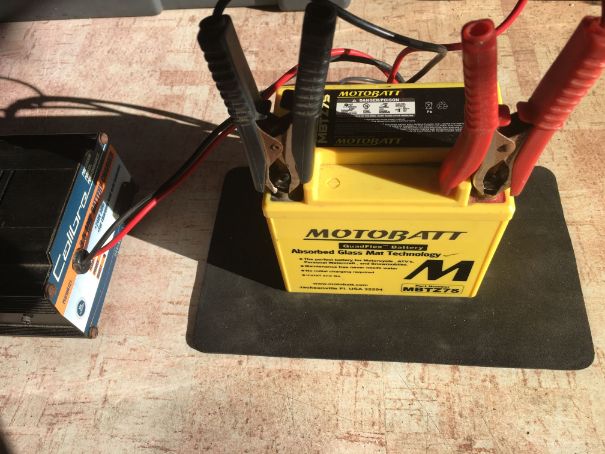
The best way to charge your battery is with a battery charger, but if you’re out riding and get caught with a flat battery you can either bump start the bike or jumpstart it by connecting it to another bike or car.
If connecting to a car make sure that the car’s engine isn’t running. The higher current coming from the car can destroy your bike’s electrical system.
Once you’ve got it running, go for a long ride to get the battery fully charged. You must ride it for quite some time at least cruising speed to produce enough voltage to recharge the battery.
How often should I charge the battery when the bike is not in use?
Lead-acid batteries discharge at a rate of about 1% of their charge every day they are sitting unused.
Some recommend fully charging your battery every 30 days, but even that may not be enough to save the battery if your bike has advanced electronic accessories or an alarm system on it.
If you ride less than once a week, it’s best to just keep your battery on a trickle charger or smart charger that will not overcharge the battery.
Do I need to remove the battery from the bike to charge it?
If your dirt bike doesn’t have an elaborate electronics system, then removing it from the bike to charge it isn’t a problem.
However, if your bike has advanced electronics like you get with some of the top-end adventure motorcycles, (like ABS, electronic throttle control, etc), then removing the battery will cause the ECU to lose all memory and you may have some problems when the bike is restarted.
To avoid this it is recommended to use a quick-disconnect plug that leaves ‘pigtails’ permanently installed on the battery. Then when connecting to a trickle charger you just plug the SAE connector into the AC extension cord.
The battery remains in the bike and is always topped up, and your bike’s ECU never has to reset and retains all its settings.
Can I use a car charger on my motorcycle battery?
It’s advisable not to. Both car and motorcycle batteries are 12 volts, however, car batteries charge at higher amperage which will quickly destroy a motorcycle battery.
The exception is if the car charger has adjustable current settings and you’re not charging at anything higher than 2-4 amps, then you may be okay.
Far safer though to use a charger designed for a motorcycle battery then you have no worries about frying your battery.
Final Thoughts
Replacing your dirt bike battery is a relatively simple process that most dirt bike riders have no problem with, just follow the steps outlined in this post, and you’ll be fine.
If you are unsure about doing the job yourself, best to get your local motorcycle dealer to do it for you.
The most important thing to remember for prolonging your battery life is to avoid completely running the battery down. Follow the tips above to avoid this and you’ll get the maximum life out of your new battery.
The battery I am using is the MOTOBATT motorcycle battery. It is shown in the pictures above and has now given me 5 years of use, so I can feel confident in recommending it.
I put it on the trickle charger often as I don’t ride often enough to keep it fully charged.
Click the link to view on Amazon if you are due for a new battery.
Related Posts

How To Adjust Your Dirt Bike Suspension – A Do It Yourself Guide
 How To Winterize Your Dirt Bike
 How to Clean A Dirt Bike Chain

Have you changed your dirt bike battery? Do you have any tips to share? Please feel free to share your thoughts below.