One of the best improvements any rider can make to their bike is to adjust their dirt bike suspension. Learning how to adjust your dirt bike suspension setup to suit the terrain you’re riding that day is a big advantage.
Forget about paying a suspension technician to do it for you, leave that to the pro riders.
To be done correctly you need to ride the same section of terrain after the adjustments are made to feel the difference in handling and make further adjustments if necessary.
That can’t be done by a technician in his workshop.
What is Compression and Rebound Damping?
Compression damping helps the suspension absorb the bumps as the wheel moves on the upward stroke.
Rebound damping helps the suspension on the return to the normal position on the downward stroke in a smooth controlled movement.
By adjusting the dampers to vary the hydraulic resistance it is possible to fine-tune the suspension to suit the different terrain, rider weight and riding styles.
How to adjust the Front Forks
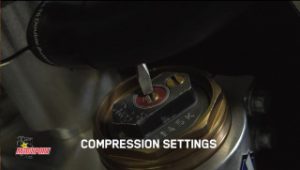
The compression and rebound damping adjusters are called ‘clickers’.
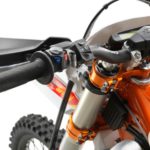
The compression adjuster is located at the top of the fork leg on most bikes. It will have the letters S & H for Soft and Hard stamped next to it. The other screw is the air bleeder. More on that later.
Tools needed: Flat blade screwdriver.
Winding the clicker clockwise towards H will harden the downward (compression) action.
Winding the clicker anti-clockwise towards S will soften the downward (compression) action.
It’s important to make small adjustments at a time, usually 2 clicks, then go for a ride over the same section of trail or track and feel any difference.
The rebound adjuster is located at the bottom of the fork leg on most bikes. This adjuster controls how quickly the fork returns to the extended position.
Winding the clicker towards the H will slow the rebound speed. Winding the clicker towards the S will quicken the rebound speed.
On some KTMs the compression clicker is located at the bottom of the fork leg, and the rebound clicker is located at the top. Turn the clicker clockwise to increase the damping, and counterclockwise to reduce the damping.
To set to standard adjustment, screw clockwise as far as it will go, then screw back 18-20 clicks (refer to your bike’s manual).
The rebound clicker is located at the top of the fork. It is a black knob that can be turned by hand, again clockwise to increase damping, counterclockwise to reduce damping.
To set to standard adjustment, screw clockwise as far as it will go, then screw back 15-20 clicks (refer to your bike’s manual).
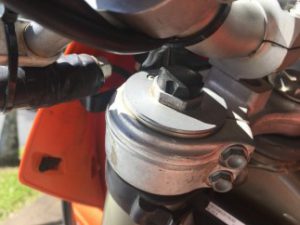
The fork spring preload on a KTM can be adjusted by turning the nut beneath the damper knob at the top of the fork. Turning clockwise will increase preload, turning counterclockwise will decrease the preload.
Changing the spring preload will not affect the damping, but generally, if you increase the spring preload, you should also increase the rebound damping. It is important to always make the same adjustment on both fork legs.`
Fork Height Adjustment
There is a line around your fork legs about 5mm down from the top. This is the standard height. Make height adjustments in increments of 2mm at a time.
If you raise the fork leg in the triple clamps, this will make the bike turn faster, but lose high-speed stability.
If you lower the fork leg in the triple clamps, this will make the bike turn slower and make the bike feel more stable.
To adjust the height, simply loosen the clamping bolts on the triple clamps and slide the fork leg to where you want it.
How to Bleed the Air from your forks
It is important to regularly bleed the air from your forks for them to work properly. Do it after every ride ideally.
The bleed screw is located next to the clicker screw at the top of the fork leg.
Turn the screw counterclockwise a few turns and you may hear some air escaping. Screw it back in, but not too tight as it is an aluminum screw. Do this with the front wheel off the ground.
How To Adjust the Rear Shock on Linkage Suspension
Compression Adjustment
Your rear suspension has a low-speed adjustment and a high-speed adjustment.
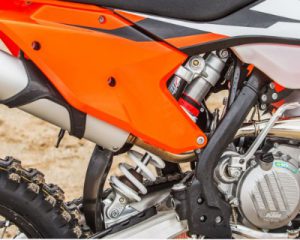
The compression adjusters are located at the top of the shock near the reservoir. The low-speed adjuster will affect how stiff the suspension is on smaller hits. It is the flat blade screw in the center of the 14mm nut.
High and low speed refers to the movement of the shock in compression, not the speed of the bike.

The high-speed adjuster is the 14mm nut on the outside. This will affect how stiff the suspension is on harder hits like jumps.
A good starting point for your low-speed adjustment is 12 clicks. Turn the screw all the way in till you feel resistance, then stop. This is zero. Do not force it past 0 or you will damage the shock body.
Back the screw out counterclockwise counting the clicks till you reach 12.
This is now set at the standard adjustment.
The high-speed adjuster nut doesn’t have clicks, so you have to count the turns.
Turn the 14mm nut clockwise all the way in till you feel resistance, then stop. This is zero. Again be careful not to force it.
Now back the adjuster out counterclockwise 2 full turns. Count in half turns.
This is now set at the standard adjustment.
Rebound Adjustment
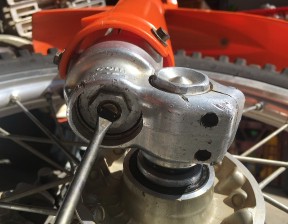
The rebound adjuster is located under the swingarm on the right side of the bike.
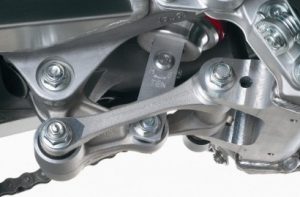
It is a small flat blade screw like the compression adjuster. Screw it in clockwise until you feel resistance. This is zero.
Now back the screw out counterclockwise counting the clicks till you reach 12.
This is now set at the standard adjustment.
When you go for a ride, if you feel the rear is too stiff: Turn your low speed and high-speed adjusters anti-clockwise to soften.
If you feel the rear is too soft: Turn the adjusters clockwise to stiffen the shock.
How To Adjust the Rear Shock on PDS (KTM) Suspension
PDS suspension is different from linkage suspension in that the lower mounting of the shock is fixed directly to the swingarm. With linkage suspension, the shock is fixed to the linkage system.
The clicker adjusters work the same as for linkage suspension.
Compression Adjustment
The compression adjusters are located at the top of the shock near the reservoir.
The low-speed adjuster is the screw in the center, the high-speed adjuster is the nut surrounding it.
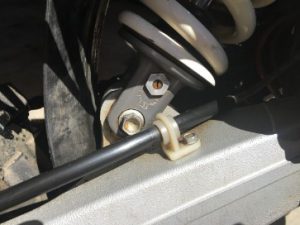
The rebound adjustment is located at the bottom of the shock, above the swingarm.
To stiffen the suspension (or reduce the rate of rebound) screw the clickers in clockwise.
To soften the suspension (or increase the rate of rebound) screw the clickers out counterclockwise.
To reset low-speed adjustment to standard settings, screw the clickers all the way in, then back them off 15 clicks (refer to your bike’s manual).
To reset high-speed adjustment to standard settings, turn the nut in clockwise as far as it will go, then back off counterclockwise one full turn.

Rebound Adjustment
The rebound adjuster is located at the bottom of the shock, above the swingarm. It is the flat blade screw in the center.
Again turn the screw clockwise to increase damping, and counterclockwise to reduce damping. Standard adjustment is backed out counterclockwise 24-25 clicks (refer to your bike’s manual).
How To Adjust The Sag
There are two types of sag:
Free sag is the amount of suspension travel used under the bike’s own weight.
Loaded (Or Rider) Sag is the amount of suspension travel used up when the bike settles with the rider sitting or standing on the bike.
You can check whether or not the shock absorber spring is suitable for your weight by checking the Loaded Sag. The Free Sag must be correct before the Loaded Sag can be determined.
To adjust the sag you need to adjust how much the spring in the shock is compressed.
The amount of sag affects the bike’s handling by changing the ride height of the bike.
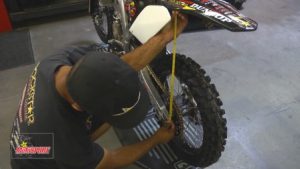
Step 1: Measure the Free Sag
Put the bike on a stand so that the wheels are off the ground. Measure the distance from the rear axle to a fixed point on the rear fender or side panel.
It should be along the arc of axle travel when the shock compresses. Use a marker pen to place notch on the spot so that you can come back to it again. Make a note of the measurement.
Step 2: Remeasure
Take the bike off the stand and have it resting on its wheels. Take the same measurement again. The difference between the two measurements is usually between 25-35mm for a linkage suspension and 33-40mm for PDS (KTM) suspension. Some newer KTMs now use a linkage suspension setup.
Free sag will tell you if you have the correct spring rate for your weight.
- 30mm or less free sag: your spring has too much preload and your spring is too soft.
- 45mm or more free sag: you don’t have enough preload on your spring and your spring is too hard. You should look at fitting a softer spring.
Step 3: Measure the Loaded Sag
You will need someone to help you with this. Have the rider stand on the pegs. The rider should be wearing full riding gear, the bike should have the correct fluid levels, and the shock should be cool to the touch. Bounce up and down a few times to allow the suspension to settle.
Take the same measurement again. The difference between the two measurements is usually between 90-110mm for a linkage suspension and 110-115mm for PDS (KTM) suspension.
If the Loaded Sag is below this range, The spring is too hard. If the Loaded Sag is above this range, the spring is too soft.
Step 4: Adjusting the Preloading of the Shock Spring
To adjust the sag on a linkage suspension bike you will need a hammer and punch. Loosen the lock ring on your shock. You can then turn the spring preload ring to increase or decrease sag.
One complete turn changes the sag by about 3mm.
On a KTM there is an adjusting ring with a clamping screw. Use a hook wrench or screwdriver for newer KTMs to adjust the ring. Clockwise will increase the preload, counterclockwise will reduce the preload.
How does the sag affect the bike’s handling?
- Decreasing sag makes the bike quicker handling but reduces high-speed stability. Good for tight tracks and muddy conditions.
- Increasing sag makes it more stable but decreases front end traction and cornering ability. Good for high speed and sandy tracks.
- Too much sag will make the front end feel too light.
- Too little sag will make your shock feel too stiff on bumps.
Summary
If this all seems confusing, then just remember with your dirt bike suspension setup, screw-in clickers clockwise stiffens the suspension, screw out counterclockwise softens the suspension.
The key is to be able to do it yourself while you are riding at the track or trail so that you can make small adjustments, then ride the same terrain again to feel the difference in handling.
If you’ve bought a used bike, it pays to reset the settings back to standard, then you can start fine-tuning to suit your weight and the terrain you’re riding. Chances are it has been set to the previous owner’s weight.
This was the case with my KTM, it was set for someone a lot heavier than me. If you’re unsure, just check your bike’s manual for the settings.
Related Posts
 How To Lower A Dirt Bike Seat height
 10 Best Dirt Bike Upgrades For Dual Sport Riding
 How To Install Dirt Bike Grips
If you have any questions or have some tips to add, please feel free to leave your comments below.
Hi, just brought a 2000 Suzuki dr250r , front suspension feels like your driving a 20 ton truck. I suspect suspension adjustment is very incorrect or front end damage?. Duel purpose bike that was set up for motard ,17″ wheels changed back over to Enduro with 21″ front 18″ rear. ….would this be prior owner not reset suspension?. Thanks. Sincerely. Lucas
Hi Lucad, thanks for your comments. The Suzuki DR250R is a great bike, you can’t go wrong with that. You’re probably right, it was set up for motard which would require it to be much harder.
There are two ways you could go about fixing it. If you refer to your owner’s manual it will tell you the number of clicks to reset it to factory settings. This would involve carefully screwing the clickers at the top and bottom of the fork right in fully, then backing them off anti-clockwise the required number of clicks in your manual, usually about 12. This will set it back to standard.
The other way is by doing fine adjustments by backing off the clickers at the top and bottom anti-clockwise to soften the damping gradually until you’re happy with it. Try 2 clicks at a time, then riding the bike over the same section of terrain so that you can feel the difference.
I would recommend doing it the first way with the manual, as you don’t know where you’re starting from with a bike you’ve just bought. If you watch the ‘Front suspension setup’ video in my post, he explains it very well.
Hope this helps.
Greg
This guide is a lifesaver! Suspension adjustments always seemed intimidating, but your step-by-step instructions make it so approachable. Can’t wait to try these tips and get a smoother ride on the trails!
Hi Daniel. Once you understand the basics, you can make small adjustments out on the trails or track, then ride the same section of terrain immediately after, and see how the changes have affected the bikes handling.
Greg
Great breakdown on suspension adjustments! I had no idea how much of an impact small tweaks could make on handling and comfort. Thanks for making it simple enough for beginners to follow!
Hi Emaa. It can all be very confusing so I put it in very simple terms for beginners to be able to have a go themselves.
Greg
Awesome DIY guide! Adjusting suspension has always felt like something only pros could do, but you explained it perfectly. Looking forward to testing out these tips on my next off-road adventure!
Hi Keith. Yes, it’s great to understand how it works. There is so much adjustability in a modern dirt bike’s suspension. It’s good to be able to make adjustments yourself.
Thanks for your thoughts.
Greg
Great information, thanks for sharing these valuable insights!
Thanks for sharing this valuable info! Proper suspension adjustment can really improve the riding experience.
Hi Peter. There is so much adjustment in dirt bike suspension now, it’s great to be able to make adjustments yourself while on the trails.
Great guide! Adjusting suspension can make a huge difference in ride comfort and performance. The step-by-step approach makes it easy for beginners to follow. Thanks for sharing.
Hi Kace. I’ve tried to make it easy to follow for riders of all levels. Technology has come a long way.
Great guide! Thank you so much for sharing this information. Excited to try these tips on my next ride!
Hi Aaron. Yes, just make small adjustments, a couple of clicks at a time, then ride the same section straight after to notice any changes. It’s great when you know how to do it yourself.
Great step-by-step guide! Suspension tuning makes a huge difference in ride quality and control. Can’t wait to try these tips on my bike.
Hi Kim. Yes it’s great to be able to make the adjustments yourself while you’re out on the trails.
Great guide! The suspension adjustments make a huge difference in riding. Any tips on fine-tuning for different terrain types?
Hi Peter. You can make adjustments for the particular terrain you’re riding that day by riding a track, make a small adjustment, then ride the same track again straight away so you have a good comparison while it is fresh in your memory.
Great guide on adjusting dirt bike suspension! It’s essential for improving handling and comfort on the trails. Thanks for breaking it down into simple steps — definitely something every rider should try themselves.
Hi Calvin. I’ve tried to keep it simple so that new riders can experiment themselves. It’s good to know.
Great guide! Adjusting the suspension really improved my ride. It’s awesome how small tweaks can make such a big difference in handling and comfort!
Hi Kace. There is so much adjustment in suspension these days, When I started riding, the only adjustment was 3 tension clicks on the rear twin shock springs. No damper adjustment. Technology has come a long way.
Great guide on adjusting dirt bike suspension! It’s awesome to see clear, easy-to-follow steps that make tuning your ride at home so much more manageable. Definitely going to give this a try next time!
Hi Kim. Being able to adjust your own suspension is a great way to save some money, and fine tune your bike to the terrain you’re riding that day. Thanks for your input.
Really helpful guide! Now I feel way more confident about adjusting my dirt bike suspension myself.
Hi Richard. Yes it is great to be able to make adjustments yourself. Especially if you have just bought the bike and it is still set up for the previous rider, who may be a lot heavier or lighter than you.