Action Camera technology has come a long way since the iconic shot above. Cameras like the GoPro have become the go-to tool for POV videos, especially for adrenaline junkies. Professionals and amateurs alike are able to capture footage from amazing angles and share their videos with the world.
In the motorcycling world, whether its road riding or dirt bike riding the fast action makes for some awesome videos. Whether you just want to capture your riding fun with your mates or use the footage as training to improve your riding technique, the action cam is ideal.
The most important factor in capturing great footage from an action cam is how it is mounted. This is where these action cam mounting tips will be helpful.
There are hundreds of different mounting options available, whether you use a GoPro mount, an aftermarket mount, or even get creative and make your own mount.
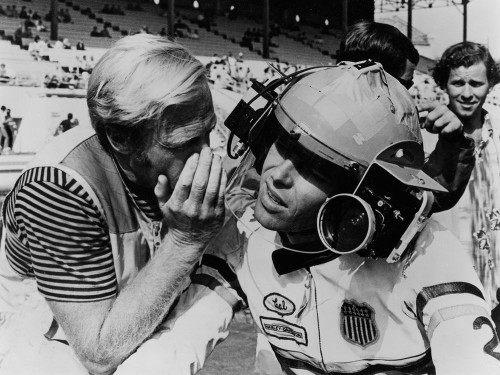
The picture above was taken during the filming of the cult motorcycle classic movie ‘On Any Sunday’.
The movie was narrated, shot, and directed by Bruce Brown using filming techniques that were innovative for 1970, but commonplace today thanks to cameras like the GoPro Hero.
Factors To Consider When Mounting:
How smooth will the footage be?
Generally, a helmet-mounted cam will give you the smoothest vision.
Your legs absorb most of the bumps of the terrain, and your head naturally keeps the camera angled correctly.
How much sensation of speed do you want?
The higher you mount the camera, the slower the sense of speed.
The lower you mount the camera to the ground, the greater the sense of speed.
How safe will the camera be?
Mounting on the top or side of the helmet leaves it vulnerable to damage by branches. It’s a good idea to tether your camera in case it falls off, and not to trust the mounting system.
Most Popular Mounting Locations
Every mounting location has its pros and cons and the best position for you will depend on what you’re trying to achieve in your video.
Helmet mounts generally give you the smoothest footage because your legs act as a buffer to the bumps on the trails, and your head naturally adjusts to the rise and fall of the terrain. You can redirect the camera by simply looking in the direction you want to film.
There are many schools of thought on where to mount a camera, and what suits you best might not suit another. The helmet you are using can also determine the position due to the location of the air vents and the shape of the chin bar.
Mounting the camera to your bike can create some awesome footage especially for on-road riding, but vibration can be a problem especially for off-road use.
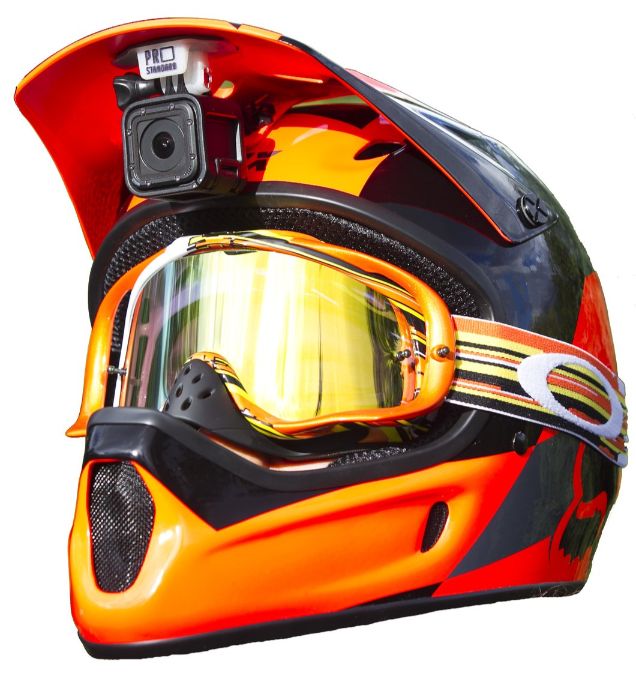
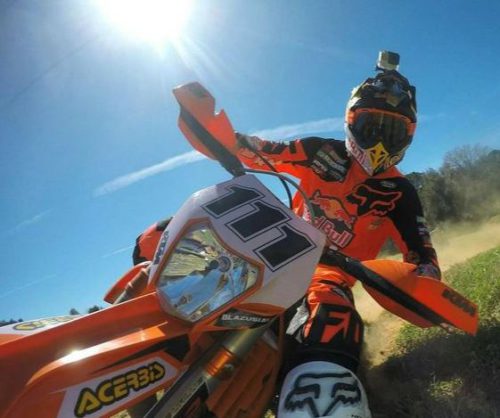
Helmet Top
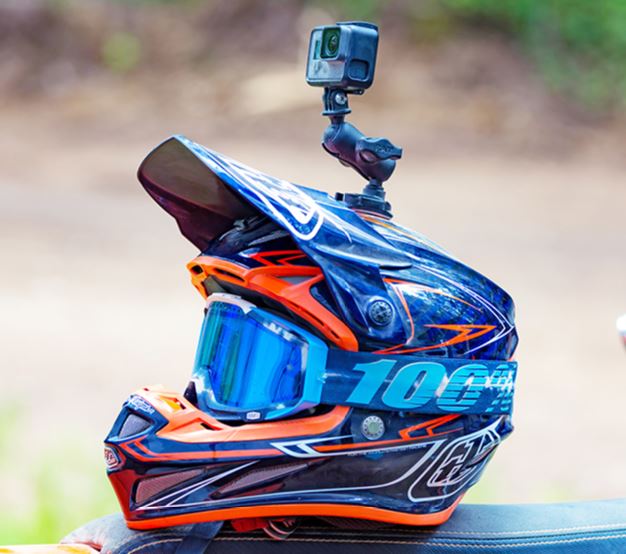
The top-mounted action cam is probably the most common location for dirt bike riders but has its drawbacks.
Pros:
- Very close to riders actual view
- Can be mounted backwards to film following riders
Cons:
- The camera is vulnerable to damage by branches etc.
- Appears slower due to height
- May experience too much head motion which can disorient the viewer
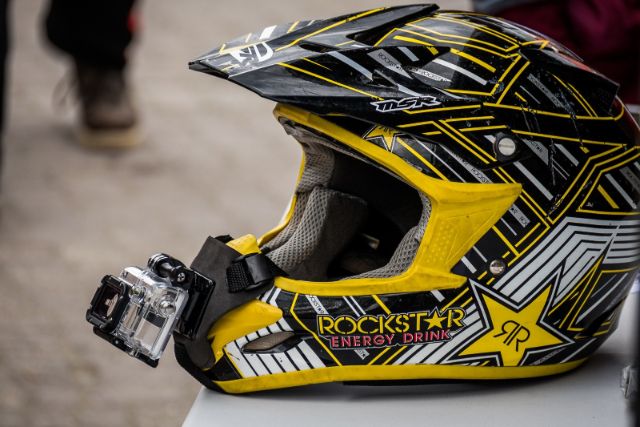
Helmet Side
Mounting on the side of your helmet can give you great footage, but can cause problems with the weight to one side, and aerodynamics at higher speeds.
Pros:
- closer to riders actual view, although offset to the side slightly
- Very immersive video and feels faster
- Can easily hear audio beeps of the camera
- Can be mounted backwards to film following riders
Cons:
- The camera is vulnerable to damage by branches etc.
- Can create wind drag at higher speeds and pull helmet to one side
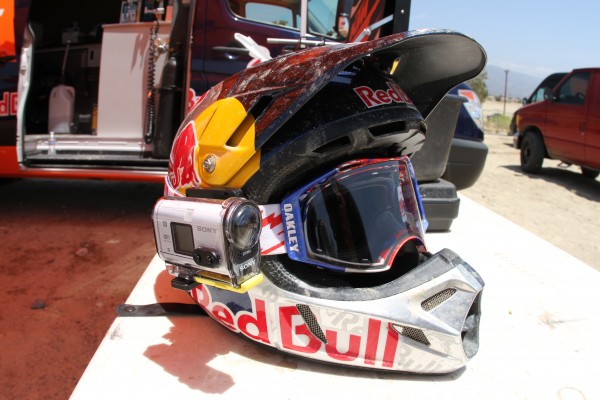
Helmet Chin guard
A chin mount gives you the closest you can get to true POV footage but is dependant on the type of helmet you have for this to work.
Pros:
- Smooth vision and appears faster
- Gives a clear view of the handlebars and is closest to the actual rider’s perspective
- Less wind drag than with top or side mounting if traveling at higher speeds
Cons:
- Can be tricky to mount if the chin bar is angular or pointed
- Can experience a lot of head motion which can disorient the viewer
Helmet Under The Visor
This position is favored by Hard Enduro legend Graham Jarvis. View any of his videos and you’ll get a good idea of the vision.
It can be tricky depending on the size of the visor, the camera you are using, and the mounting system. If it requires mounting the camera upside down then you will have to go into the camera settings and rotate the image 180 degrees.
Pros:
- The camera can’t snag on branches
- Can easily hear the camera and see the red light flashing
- Can immediately see if the camera falls off
Cons:
- Vision only occasionally sees the handlebars
- The higher view makes the action appear slower
- The camera may partially block your view
- may need to adjust camera settings if mounting inverted
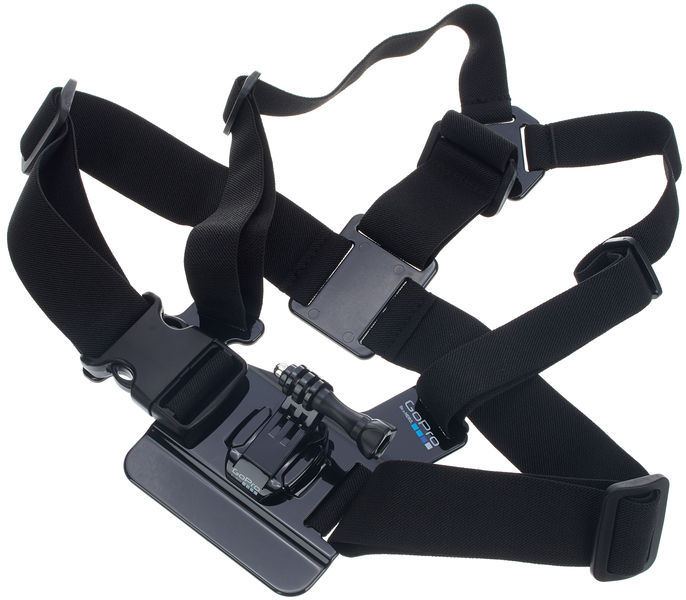
Chest Mounting
Chest mounting an action cam is becoming more popular with riders because it puts the viewer in the rider’s seat, so to speak.
If you’re a motocross rider and wanting to use the footage to help improve your riding technique, the chest mount is a good option because the handlebars and controls are in view.
The only downside is that in the event of a get-off the camera may cause a chest injury, but wearing the harness over your chest protector will certainly help.
Pros:
- Camera location makes it easy to operate
- Very immersive video and feels fast
- Great if you want to show handlebars and controls in shot
- Less wind drag than with helmet mounts
- Camera weight not as noticeable as with helmet mounts
- Can be fitted backward for filming following riders
Cons:
- Not as smooth as helmet footage
- Can easily be pointed too high or low
- The angle varies widely with body positioning
- Chest mount harness must be purchased separately
Mounting On The Bike
Mounting the camera to your bike can create some awesome footage especially for on-road riding, but can be a little shaky for off-road use depending on where you mount it.
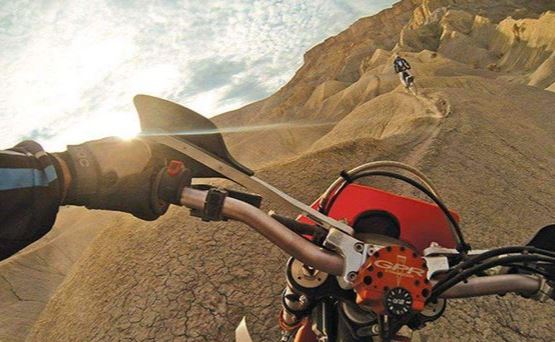
Handlebar/Steering Stem Mounting
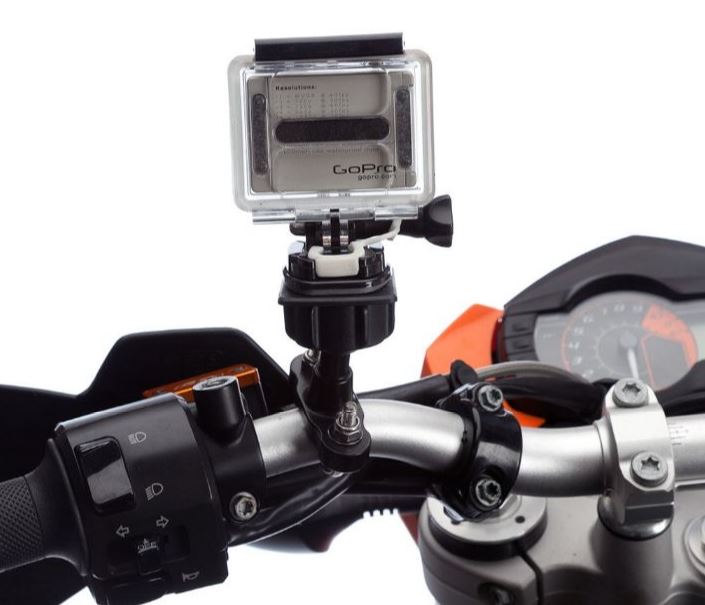
A handlebar mount can give you a good POV, but it doesn’t capture the controls. If you are using the video for training purposes you can’t see how you are using the throttle clutch and brake under the different circumstances.
Pros:
- No weight felt by the rider
- Stable mounting location
- Camera location makes it easy to operate
- Can include gauges in the shot if mounting on the steering stem
Cons:
- Vibration and handlebar movement can ruin the shot, more suitable for road riding
- Adventure bikes with a windshield may interfere with the shot
On The Frame/Passenger Pegs

The lower mounting position enhances the sensation of speed being mounted closer to the ground, but is best used as a secondary mounting location for videos that include several angles.
Pros:
- No weight felt by the rider
- Stable mounting location
- Very immersive video and feels fast
- Gives a unique angle when leaning the bike
- Can be fitted forwards or backward for filming following riders
Cons:
- Can pick up lots of vibration from the bike
- The footage is only on one side of the bike
- Prone to damage and lens getting dirty
- Better suited to smoother road riding rather than dirt
Tips For Using An Action Cam
- When using a helmet cam always keep in mind that the camera is there. Avoid moving your head suddenly, and try to ride smoothly on the bike over the terrain, although this can be hard on a dirt bike. Also, be aware of low tree branches and other obstacles. It’s easy to forget the camera is there.
- Always tether your camera. Don’t trust the mount, especially as they are usually just glued to your helmet. A nylon cord or braided fishing line works well.
- Plan in advance. If you’re riding a known route, decide where you’re going to capture some handheld footage of you riding by, or tackling some terrain like a hill climb or water crossing.
- Regularly check that the camera lens is clean. In dirt riding, especially a drop of water or mud on the lens can ruin a lot of footage.
- Consider using an external microphone. Position it to avoid picking up that dreaded wind noise. Adding those engine noises and exhaust notes will greatly enhance your video footage.
- When editing, mix up the clips of the different camera angles from on-board, and hand help clips of you going by on your bike.
- Get creative! It’s fun to experiment with mounting locations, camera angles, and editing software. There’s an infinite number of ways and places to mount an action cam, limited only by your imagination.
Angling the Camera
Angling the camera correctly is imperative or you may completely miss out on what you’re trying to capture. It’s important to test run before you head off or you may be just recording the sky or the ground.
It’s important to record with as few options turned on as possible. The more features you enable, the shorter the battery life. Some cameras have the ability to record in 4K, but unless your television or computer displays in 4K there’s no need to enable this feature.
It’s also going to take up more space on your SD card, your computer, and may need a little editing too. YouTube has the option to upload and watch videos in 4K, so depending on what you’ve recorded it may be worth considering.
Also, it’s important to check the camera is still in place if you come off or the camera gets bumped when passing obstacles like branches.
Action cameras are designed to withstand extreme conditions and environments like those encountered by dirt bike riders. Most include protective housing for durability and providing waterproofing.
Aftermarket housing units are available for most action cams if you are looking for more protection.
Drones
Drones have opened up a whole new dimension, whether it’s filming sporting events like the winter Olympics skiing, or getting aerial shots of buildings or the spectacular countryside.
In the dirt bike world, drones were used with dramatic effect by Adam Riemann of Motology films in the recording of his adventures in the MOTONOMAD trilogy of films.
In the first MOTONOMAD film, Adam and his mate Mark Portbury used drones and helmet cams to record their 7000 km trip from Austria to Egypt on two KTM 500EXCs.
The film was so successful, they repeated their adventures in MOTONOMAD II – Riders of the Steppe and MOTONOMAD III – Riders of the Andes
Related Posts
Best Action Cam For Dirt Bikes
Dirt Bike Movies – 5 You Must See
 Adventure Motorcycle Travel DVDs – A Few To Inspire You
Have you used an action cam to record your dirt riding adventures? Have you found a mounting location that works for you?
Hi Greg,
Though I am on the lookout for a hand held camera, I need to know how I can mount it and from what angle.
Your article on mounting positions for dirt bikes is therefore very interesting to me. The head and chest angle is useful for when I make smoothies and want to create a 10 minute video.
The only thing with dirt bikes is that one call fall off them. So a mount camera needs to be quite sturdy. I will bookmark this site to choose the best angle I could use.
Thanks for sharing!
Hi Stella. The uses are only limited by your imagination. The small size and weight mean you can use these for almost any activity, not just sporting activities. Thanks for your thoughts.
Greg
I think the industry of the camera is making a great improvement when it comes to the camera for sport. For every sport, there is a camera which will take quality footage and resist to the extreme conditions of that sport. Like in diving, or motocross.
I think the helmet chin guard is well placed to take the best footage. You will have to find a good helmet to fit your camera but I do not think the head motion will really disturb the viewer. I think it will feel really like the viewer is riding in real-time.
Thanks for sharing.
Yes, the chin bar mount is about the closest to the riders actual view. It just depends on the type of helmet, some will be easier to mount than others. Thanks for your thoughts.
Greg
When I never wondered if a camera could be at different points in the rider/bike rider
The camera to be mounted should have the corresponding crank the rider or place in any crank?
I have no experience with the subject, but as a bicycle rider, it would be useful to set up a camera and share my experience with my family
Hi and thanks for your comments. I think for cyclists the same would apply. I’ve seen some great mountain bike footage and the helmet mounting positions would be the same as for motorcycles. The helmet top and side would be good options, as well as a chest mount. If you’re riding a bicycle on the road and want to get some footage, you may even be able to mount onto the handlebars or frame. It would be a good idea to look for GoPro cycling footage on YouTube for inspiration. Thanks for dropping in.
Greg